Pop-and-Drag (photo lesson #2)
My friend, Crisco, and I went to a gallery show of photos on Saturday. Amazing stuff! Photographs I have only seen in books and not in person. This is at the Vancouver Gallery of Photography until 31 March.
Photographers like: Dorothea Lange, Edward Steichen, Man Ray, Herb Ritz, you get the idea. What impressed me is that these are a private collection from a Vancouverite! (Thank you Yosef Wosk!) I never knew Vancouver actually liked to pay for art never mind photography! There may be hope for this city (and this photographer) yet.
After the gallery I was teaching her some photo skills and one skill she has been having difficulty learning is the pop-and-drag.
Pop-and-drag has been used for ages by photographers to still a moment but also show movement within the photograph. For example:
It is possible to do this with an automatic Point and Shoot camera (like we did).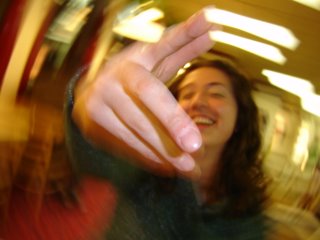
1) You have to know your flash settings. Change your flash setting to the one with the flash symbol and a letter (or some other such symbol) beside it. This is the flash at night setting. When you take a photo on this setting the flash will go off right away but the shutter will stay open longer than normal.
2a) (This part takes practice.) Take a photo of the subject you want stopped in motion however after the flash goes off move the camera right away. You have to be very fast and know the time delay before and after the flash. It takes practice but looks funky!
2b) You can hold still and take a photo of a moving object. Make sure your flash goes off where you want the action stopped.
2c) Move the camera during the whole exposure. Make sure (as in 2b) your flash goes off where you want the action stopped.
Thank you to Crisco for taking this wonderful photo! It seems Crisco learned the lesson well! Well done!
Photographers like: Dorothea Lange, Edward Steichen, Man Ray, Herb Ritz, you get the idea. What impressed me is that these are a private collection from a Vancouverite! (Thank you Yosef Wosk!) I never knew Vancouver actually liked to pay for art never mind photography! There may be hope for this city (and this photographer) yet.
After the gallery I was teaching her some photo skills and one skill she has been having difficulty learning is the pop-and-drag.
Pop-and-drag has been used for ages by photographers to still a moment but also show movement within the photograph. For example:
It is possible to do this with an automatic Point and Shoot camera (like we did).

1) You have to know your flash settings. Change your flash setting to the one with the flash symbol and a letter (or some other such symbol) beside it. This is the flash at night setting. When you take a photo on this setting the flash will go off right away but the shutter will stay open longer than normal.
2a) (This part takes practice.) Take a photo of the subject you want stopped in motion however after the flash goes off move the camera right away. You have to be very fast and know the time delay before and after the flash. It takes practice but looks funky!
2b) You can hold still and take a photo of a moving object. Make sure your flash goes off where you want the action stopped.
2c) Move the camera during the whole exposure. Make sure (as in 2b) your flash goes off where you want the action stopped.
Thank you to Crisco for taking this wonderful photo! It seems Crisco learned the lesson well! Well done!
posted by lara photoer at 1:19 PM
![]()
![]()

0 Comments:
Post a Comment
<< Home